Since the bewitching month is finally upon us, I decided to work my magic and have our cookie cutter home looking like a "real" haunted house. I expected that in a blink of an eye, I would have the yard looking as realistic and horrific as a professional haunted house...sigh. I opened and closed my eyes several times and nothing like that ever occurred.The only transformation that took place this evening was within myself.
1. I have much more respect (and I'm in true awe) of professional haunters, 2. Cardboard does not stick to brick with duct tape (I was trying to "board" my window) and 3. Never go out in the yard with no shoes or socks. I look like a hob-goblin.. it's truly disgusting. AND I was ferociously attacked my mutant ants!
All-n-all the house is coming along... still more to be done. On the bright side, I still have time.
Saturday, October 1, 2011
Want to complete a project in < 30 min?
Speaking of trees... I made this small Halloween tree the other day. It's not the best picture, but you get the idea. All I did was paint a tree limb, find a pot (I used a potion bottle) and attach the mini skeleton and moss. I also added some spider webbing to the branches.
Friday, September 30, 2011
Beginner Haunted Tree
Well I couldn't resist any longer...

 Update: October 2nd - The tree scene is finished (not put together, but finished as far as paint goes.) I also added a full moon. I so wish I had black walls! The scene would just really POP then! (Added pics below-wish I had a better camera, but you get the idea...).
I had to post the haunted tree with the 4 grave stones! My mom and I put together the grave (and mounds), but we wanted a tree. Well now there is one! Of course it is made out of cardboard, but I don't have the time to attempt to make a "real" one (too many projects - maybe for next Halloween?). This took approx. 2-3 hours to cut, glue, support and decorate. It took a bit to support the tree due to the weight on the right-hand side. I have it away from the wall (that is a 3-D crow, not a sticker). I had to keep the plots a bit from the door (heavy traffic area). I am going to paint tthe tree so it doesn't look like cardboard (thanks Hubby) & hoping to do a bit more with the scene, BUT here are some pics to show you what I'm so excited about.

 Update: October 2nd - The tree scene is finished (not put together, but finished as far as paint goes.) I also added a full moon. I so wish I had black walls! The scene would just really POP then! (Added pics below-wish I had a better camera, but you get the idea...).
Witch Kitchen
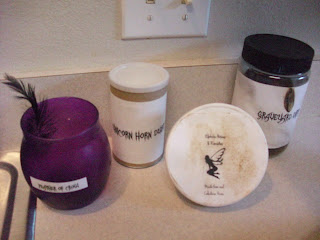
I started working on my Witch Kitchen! Here are some pics of nastiness I created. I can't wait to put everything together and have it completed. Of course, I will add the pics to this post when it is finished.
Shrunken heads, Ogre Nose Hair
& a pair of Fairy Feet...
Crushed Larynx, Dragon Blood, Goblin Snot,
Deadly Nightshade, Snake Oil...
Feather of Crow, Unicorn Horn Dust, Graveyard Dirt...
Current Projects
I have just recently finished making spooky candles from toilet paper and paper towel rolls. I have added the how to below. If you want to mount to the wall (which I did), just hot glue a thick piece of cardboard to the BACK of the finished candle. Make sure that it isn't visible from the sides of the candle. Then you can sticky tack (or tape) the candle to the wall without damaging the candle.
I am currently working on two spell books (see below for link). They have been the most fun projects to work on! Here are some pictures of them. These are still 'under construction'! I will post the final product when I finish them. I used a shoe box for Spell book #2 .
Book One:
Book Two:
To see spell book(s) how to's:
Click Here
To see how-to for candles:
Click Here
I am currently working on two spell books (see below for link). They have been the most fun projects to work on! Here are some pictures of them. These are still 'under construction'! I will post the final product when I finish them. I used a shoe box for Spell book #2 .
Book One:
Book Two:
Update: October 1st -- Painting (Finished w/ Book 1) -- Whooo hooo! Finally went to the craft store!
I want to add a bookmark, but I just haven't found anything that has suited me just yet.
Spell Book 2 (Only 1/4 painted & it's still wet)
FINISHED (BOOK 2)
I emded up gluing the flap down, so now the book doesn't open at all.
I bought some magnets at Michael's which really weren't worth the money I paid for them.
I'm in a bit of a rush this year, so maybe after everything calms down,
I will try again.
 |
| Side view |
 |
| Flap part of book |
 |
| Front - Used paints to make the book look old |
To see spell book(s) how to's:
Click Here
To see how-to for candles:
Click Here
Trick-or-Treat
Why hand out candy from a plain generic bowl, when you can make your own? I found this easy project in the Martha Stewart (2011) Halloween magazine.
Supply List:
1 Shoe box
Moss
Leaves
Pencil/Pen
Hot glue (& gun of course!)
Cardboard
Stencils (optional)
Scissors
*There are two options for the finish of the grave and tombstone. You can cover the two with construction paper OR you can paint. I wanted to paint mine, so I purchased some acrylic paint from Hobby Lobby). If you want to cover with construction paper, then I advise also purchasing a craft glue stick.
1. We are going to focus on the shoe box first. Grab the lid and cut a hole in the center. The hole needs to be large enough for a hand to fit through. You can measure it out if you want an even cut, but it is not necessary.
2. The additional piece of cardboard is to create a tombstone. You can draw your outline or find one online that you like.
3.Cover/Paint your box, lid and tombstone. Leave the hole you cut earlier open. If you painted, then let it dry before continuing to the next step. I tried to make my tomstone appear weathered. Not sure if it turned out the way I wanted, but then again, I am my own biggest critic.
4. Grab your stencils (you can also freehand this). Decorate your tombstone however you want! (I used the traditional RIP).
5. I then hot glued my tombstone to the shoebox.
6. Hot glue moss, leaves and any other spooky accessories to your tombstone (or the box).
7. Place candy inside and your finished!
By the way: I highly recommend Martha Stewart's Halloween magazine. It is, in my opinion, the best Halloween magazine out in the stands.
FONTS
Need a cool font for your witch kitchen? I did!
I found TONS of fabulous fonts & most of these are FREE for personal use.
The link is listed below:
http://www.dafont.com/
I found TONS of fabulous fonts & most of these are FREE for personal use.
The link is listed below:
http://www.dafont.com/
Welcome to the Blogger World
I just want to say hello to everyone and to ask for patience. I am learning as I go! I am very excited about this "project" - as it certainly is one!
Viewers beware: You may be bombarded with posts in the beginning (as I have completed projects that I'd like to share).
Viewers beware: You may be bombarded with posts in the beginning (as I have completed projects that I'd like to share).
Subscribe to:
Comments (Atom)


